Apache HTTP 서버와 Tomcat 등 WAS 연동을 위한 모듈 파일입니다.
다운로드 찾기가 힘들어서 블로그에 파일 업로드합니다~
…. 이거 불법일까?–;
1593959138.so
Tag: java
Spring2.0의 달라진 점 요약
Spring2.0의 달라진 점 요약
이 글은 스프링 프레임워크의 창시자인 Rod Johnson이 InfoQ에 게제한 Spring 2.0: What’s New and Why it Matters 기사를 한글로 요약한 글입니다. 원본 기사는 http://www.infoq.com/articles/spring-2-intro 에서 보실 수 있습니다. Spring 프레임워크가 버전 1에서 2로 올라서면서 무엇이 어떻게 달라진 것인가 대략적으로만 살펴보는 글이기 때문에 상세한 내용을 원하시는 분은 위 URL로 가셔서 원문을 직접 읽어보세요
스프링 2.0의 주요 변경 사항
- 설정 확장: 스프링 2.0은 확장 가능한 XML 설정을 지원한다. 이는 새로운 (좀 더 상위의 ) abstrace level에서 스프링 빈을 정의할 수 있다는 것을 의미한다. (역주; XML 스키마를 따로 정의해서 빈 정의를 추상화시킨다는 것을 말하는 것 같다.)
- AOP 프레임워크에 대한 중요한 발전이 있었다. 좀더 강력하고, 사용하기 쉽도록.. (AspectJ와의 모종의 합의?가 있었던것 같음.)
- Java 5를 지원하도록 발전되었다. (하지만 국내 환경에서 아직 Java 5는 대세가 아니기 때문에 우리에겐 큰 의미가 없는 것 같다.)
- 스프링 빈이 다양한 언어에 의해 구현될 수 있게 되었다. (Groovy, JRuby, Beanshell 등) 다른 언어를 사용하면서도 Dependency injection이나 AOP와 같은 스프링 컴포넌트 모델은 유지된다.
- 포틀릿 MVC 프레임워크와 같은 새로운 기능이 추가되었다. 또한 Java Persistence API (JPA)와의 API 통합, 비동기 태스크 수행 프레임워크가 추가되었다.
Rod Johnson은 이번 기사에서는 XML 설정 확장과 AOP, Java 5에 대해서만 언급을 했습니다..!
XML 설정 확장 기능
단순한 bean 태그로만 구성되어 있는 기존의 스프링 XML 설정으로는 뭔가 한계가 있다. XML 스키마를 따로 만들어주어 복잡한 빈 설정들을 단순하게 만들 수 있다.
예를 들어 스프링 1.x에서는 트랜잭션 처리를 위해 다음과 같은 3개의 빈을 설정해 주어야 했다.
<bean class=”org.springframework…DefaultAdvisorAutoProxyCreator”/>
<bean class=”org.springframework…TransactionAttributeSourceAdvisor”>
<property name=”transactionInterceptor ref=”transactionInterceptor”/> </bean>
<bean id=”transactionInterceptor”
class=”org.springframework…TransactionInterceptor”>
<property name=”transactionManager” ref=”transactionManager”/>
<property name=”transactionAttributeSource”>
<bean class=”org.springframework…AnnotationsTransactionAttributeSource”>
</bean>
</property>
</bean>
그러나 스프링 2에서는 기본적으로 제공되는 tx 네임스페이스를 사용해서
<tx:annotation-driven />
단 한줄의 태그 삽입만으로 트랜잭션 설정이 종료된다. 물론 tx 네임스페이스를 사용하겠다고 다음과 같이 스프링 설정 XML 문서에 선언해주어야 한다.
<?xml version=”1.0″ encoding=”UTF-8″?>
<beans xmlns=”http://www.springframework.org/schema/beans”
xmlns:xsi=”http://www.w3.org/2001/XMLSchema-instance”
xmlns:tx=”http://www.springframework.org/schema/tx”
xsi:schemaLocation=”http://www.springframework.org/schema/beans
http://www.springframework.org/schema/beans/spring-beans-2.0.xsd
http://www.springframework.org/schema/tx
http://www.springframework.org/schema/tx/spring-tx-2.0.xsd“>
이러한 확장 태그는 기존의 bean 정의 태그와 섞여서 함께 사용될 수 있다.
일단 스프링 2.0에서 제공되는 out-of-the-box 네임스페이스의 목록은 다음과 같다.
- Transaction management (“tx”): Making Spring beans transactional becomes significantly easier in Spring 2.0, as we have seen. It also becomes easier to define “transaction attributes” mapping transactional behavior onto methods.
- AOP (“aop”): Specialized tags allow AOP configuration to be much more concise in Spring 2.0 than previously, without the IoC container needing to depend on the AOP framework.
- Java EE (“jee”): This simplifies working with JNDI and other Java EE APIs, as we have seen. EJB lookups gain still more than JNDI lookups.
- Dynamic languages (“lang”): Simplifies the definition of beans in dynamic languages-a new feature in Spring 2.0.
- Utils (“util”): Simplifies loading java.util.Properties objects and other common tasks.
스프링 2.1 이후에는 더 풍부한 네임스페이스가 제공되어 다양한 영역에서 이러한 단순한 설정을 활용할 수 있게 될 예정이다. 물론, 스프링에서 기본 제공되는 네임스페이스 외에 제 3자 (third party)가 제공하는 네임스페이스를 활용하거나 직접 네임스페이스를 정의해서 사용 가능하다. 대표적인 예가 Acegi Security (2007년 상반기 중에 Spring Security로 재탄생될 예정..!) 관련 빈 설정을 한단계 추상화한 예이다.
그러면 어떻게 커스텀 네임스페이스 구현할 수 있을까? 매우 간단하다…! 다음 세 단계를 따라하기만 하면 된다.
- XML 스키마를 정의한다. 가장 어려운 스텝이다. 적절한 XML 유틸리티 프로그램으로 작성하면 된다.
- 1번에서 정의한 스키마로 부터 BeanDefinition을 생성하기 위해 NamespaceHandler 인터페이스를 구현한다.
- spring.handlers 등록 파일을 수정하여 스프링 프레임워크가 새로 생성한 NamespaceHandler를 인식하도록 한다.
http://www.springframework.org/schema/util=org.springframework.beans.factory.xml.UtilNamespaceHandler http://www.springframework.org/schema/aop=org.springframework.aop.config.AopNamespaceHandler http://www.springframework.org/schema/lang=org.springframework.scripting.config.LangNamespaceHandler http://www.springframework.org/schema/tx=org.springframework.transaction.config.TxNamespaceHandler http://www.springframework.org/schema/jee=org.springframework.ejb.config.JeeNamespaceHandler http://www.springframework.org/schema/p=org.springframework.beans.factory.xml.SimplePropertyNamespaceHandler
다수의 spring.handlers 파일은 서로 다른 META-INF 디렉토리에 넣어두고 사용할 수 있다. 그러면 스프링이 런타임에 이들을 하나로 병합하게 된다. 스프링 배포에 함께 포함되는 spring.handler 파일을 열어보면 ‘표준’적인 네임스페이스 설정을 살펴볼 수 있다.
이렇게 XML 확장 태그를 정의해서 사용할 수 있게 된 것은 분명 좋은 일이지만…. 합당한 이유 없이 무분별하게 사용되어서는 안된다. 왜냐 하면 XML 확장 태그를 정의하는 것은 추상화 단계를 더 높이는 일이고 이는 곧 사람들이 뭔가 공부해야 할 것이 늘어난다는 것을 의미하기 때문이다. 이미 스프링의 XML 빈 설정 방식은 수십만의 개발자들에게 친숙해졌는데 분명한 이유 없이 커스텀 네임스페이스를 만들 필요가 있을까….?
다양해진 Bean의 Scope
스프링2.0에서 달라진 것 중의 하나는 bean의 scope가 더 다양해졌다는 것이다. 스프링2.0 이전에는 빈의 스코프 속성으로 Singleton과 Prototype(싱글톤이 아닌것) 2가지가 설정 가능한 것이었다. 그러나 스프링 2.0에서는 커스텀 스코프를 설정할 수 있게 되었다.
웹 어플리케이션에서는 세션에 오브젝트를 담는 방법에 대한 요구 사항이 많았었다. 이 요구는 스프링 2.0의 out of the box에 의해 지원이 될 수 있게 되었다.
<bean id=”userPreferences” class=”com.foo.UserPreferences” scope=”session”/>
이 bean 정의에서 스코프로 디폴트값인 singleton이 아닌 session으로 정의되었다. (커스텀 scope는 어떤 이름으로 줘도 상관 없지만 session과 request는 웹 어플리케이션에서 사용하기 위해 예약되었다.)
userPreferences를 getBean()으로 부르게 되면 스프링은 현재 HTTP 세션으로부터 UserPreference의 오브젝트를 가져오게 된다. 만약 세션에 그런 오브젝트가 담겨있지 않으면 새로운 오브젝트를 하나 생성하면 그만이다. 세션으로 부터 오브젝트를 가져오는것을 가능하게 하려면 web.xml에 다음과 같이 리스너를 더 등록해야 한다.
<web-app>
…
<listener>
<listener-class>
org.springframework.web.context.request.RequestContextListener
</listener-class>
</listener>
…
</web-app>
…
<listener>
<listener-class>
org.springframework.web.context.request.RequestContextListener
</listener-class>
</listener>
…
</web-app>
그런데 만약…. userPreferences빈을 자신보다 더 긴 라이프사이클을 갖는 다른 빈에다 inject시켜야 하는 경우에는..? 예를 들어 스프링 MVC 컨트롤러에서 다음과 같이 userPref를 사용할 수 있다.
public class UserController extends AbstractController
{
private UserPreferences userPreferences;
public void setUserPreferences(UserPreferences userPreferences)
{
this.userPreferences = userPreferences;
}
@Override
protected ModelAndView handleRequestInternal(HttpServletRequest request, HttpServletResponse response) throws Exception
{
// do work with this.userPreferences
// Will relate to current user
}
}
이 경우 우린 just in time 인젝션이 가능했으면 좋겠다고 생각하게 된다. (역주; just in time injection? 라이프사이클이 더 짧은 UserPref 오브젝트가 userpref를 사용하려고 하는 순간 그때 오브젝트가 resolve되는… 마치 하이버네이트 같은 ORM의 lazy loading과 같은 개념 같다.)
그런데.. 우리가 착각하고 있는게 하나 있다. 바로 스프링의 빈 인젝션이 static하다고 생각하는 것이고 그래서 stateless하다고 생각하는 것이다. 이건 사실이 아니다. 왜냐면 스프링은 AOP 프레임워크이기 때문이다…! ㅡㅡ;
<bean id=”userPreferences” class=”com.foo.UserPreferences” scope=”session”> <aop:scoped-proxy/> </bean>
<!– a singleton-scoped bean injected with a proxy to the above bean –> <bean id=”userController” class=”com.mycompany.web.UserController”> <!– a reference to the proxied ‘userPreferences’ bean –> <property name=”userPreferences” ref=”userPreferences”/> </bean> </beans>
이러한 설정으로 이 문제는 쉽게 해결된다.
이제 빈 resolution은 다이내믹하게 발생하게 될 것이다. UserController 안의 userPref 인스턴스는 세션에 있는 UserPref의 오브젝트에 대한 프록시가 된다.
이런 작업들 속에서 세션 객체를 직접적으로 건드릴 필요는 없다. 또한 유닛테스트 때에도 HttpSession 오브젝트에 대한 mock 없이도 테스트가 가능하다. just in time 인젝션에 대한 다른 방법도 있다. (lookup를 사용한건데 이건 그다지 중요한 개념이 아닌 것 같으므로 생략하고 보시길 원하시는 분은 원문을 보시길)
스프링 2.0과 자바 5
스프링 2.0은 자바 5를 지원한다고 하는데 대표적으로 자바5의 generics와 같은 장점들을 활용할 수 있게 만들어준다.
public class DependsOnLists { private List plainList;
private List<Float> floatList;
public List<Float> getFloatList() {
return floatList; }
public void setFloatList(List<Float> floatList) { this.floatList = floatList; } public List getPlainList() { return plainList; }
public void setPlainList(List plainList) { this.plainList = plainList; }
}
여기서 plainList는 전통적 방식의 콜렉션이고, floatList는 새로운 방식의 콜렉션이다.
<bean class=”com.interface21.spring2.ioc.DependsOnLists”> <property name=”plainList”> <list> <value>1</value> <value>2</value> <value>3</value> </list> </property> <property name=”floatList”> <list> <value>1</value> <value>2</value> <value>3</value> </list> </property> </bean>
이 빈 설정에서 스프링은 floatList를 잘 populate하겠지만
다음 테스트 코드를 보면…
public class GenericListTest extends AbstractDependencyInjectionSpringContextTests {
private DependsOnLists dependsOnLists;
public void setDependsOnLists(DependsOnLists dependsOnLists) { this.dependsOnLists = dependsOnLists; }
@Override protected String[] getConfigLocations() { return new String[] { “/com/interface21/spring2/ioc/inference.xml” }; }
public void testLists() { List plainList = dependsOnLists.get
PlainList(); List<Float> floatList = dependsOnLists.getFloatList(); for (Object o : plainList) { assertTrue(o instanceof String); System.out.println(“Value='” + o + “‘, class=” + o.getClass().getName()); } for (Float f : floatList) { System.out.println(“Value='” + f + “‘, class=” + f.getClass().getName()); } }
}
이 테스트 코드의 결과이다.
Value=’1′, class=java.lang.String Value=’2′, class=java.lang.String Value=’3′, class=java.lang.String Value=’1.0′, class=java.lang.Float Value=’2.0′, class=java.lang.Float Value=’3.0′, class=java.lang.Float
향상된 AOP 기능
스프링2.0의 가장 큰 진보는 AOP를 더 쉽고 간단하게 사용할 수 있게 된 것이다. 스프링 팀에게 있어서 AOP는 가장 중요한 가치였다. 왜냐면.. AOP는 전혀 새로운 생각의 방식을 하도록 하기 때문이다. pure oop로는 해결하지 못하는 다양한 문제들도 AOP 적용으로 쉽게 해결되기도 한다.
스프링 2.0 이전의 AOP에선 약간의 결점이 있었다. (귀찮아서 번역 안했습니다. 죄송…ㅜㅜ) Only simple pointcuts could be expressed without writing Java code. There was no pointcut expression language allowing sophisticated pointcuts to be expressed concisely in strings, although RegexpMethodPointcutAdvisor allowed simple regular expression-based pointcuts to be defined.
XML configuration could become complex when configuring complex AOP usage scenarios. The generic element was used to configure the AOP classes; while this was great for consistency, offering DI and other services to aspects as well as classes, it was not as concise as a dedicated configuration approach.
Spring AOP was not suited for advising fine-grained objects-objects need to be Spring-managed or proxied programmatically.
The performance overhead of a proxy-based approach can be an issue in a small minority of cases.
Because Spring AOP separates the proxy and the target (the object being decorated or advised), if a target method invoked a method on the target, the proxy would not be used, meaning that the AOP advice would not apply. The pros and cons of using a proxy-based approach to AOP are beyond the scope of the article: there are some definite positives (such as being able to apply different advice to different instances of the same class), but this is the major negative.
스프링 2.0에서는….. align with AspectJ in Spring 2.0 하기로 했다. 왜냐면 AspectJ는 풍부한 포인트컷 표현 언어가 있기 때문에…
이 코드를 보면 이해가 갈 것이다.
@Aspect public class AnnotatedBirthdayCardSender {
@After(“execution(void com.interface21..Person.birthday()) and this(person)”) public void onBirthday(Person person) { System.out.println(“I will send a birthday card to ” + person.getName() + “; he has just turned ” + person.getAge()); } }
복잡한 XML 설정이 아니라 자바5의 문법을 최대한 활용해서 간단하게 AOP를 구현한 모습이다. (역주; 자바 5의 강점을 멋지게 활용한 것 같습니다… 하지만 개발 환경이 자바2라면 소용이 없다는거…)
그럼 XML로 AOP 포인트컷을 정의해주는 방식과 AspectJ의 방식 중 어느것을 사용할 것인가…?
어느것을 사용해도 무방하지만 다음과 같을 경우에는 꼭 XML을 사용할 것.. Use XML if: You are unable to use Java 5, and have no choice. Spring 2.0’s AOP enhancements, except for processing @AspectJ syntax, work on Java 1.3 and 1.4 as well as Java 5, although you won’t be able to write pointcut expressions matching annotations or other Java 5 constructs.
You might want to use the advice in different contexts.
You want to use existing code as advice, and don’t want to introduce AspectJ annotations into it: for example, introducing an Observer behavior invoking a method on an arbitrary POJO.
AspectJ 방식의 포인트컷 정의 방식을 사용한 예제는 http://www.infoq.com/articles/spring-2-intro 에 있습니다.
자바 코드 내에서 인코딩 변경
우리 회사의 솔루션은 UTF-8 기준으로 만들어졌기 때문에 대부분의 웹사이트에서 사용중인 EUC-KR로 인코딩된 스트링을 UTF-8로 변환할 필요가 있다.
아래 코드를 사용하면 자바 소스 내에서 바로 인코딩 변환이 가능하다.
String euckr = “가나다”; // EUC-KR
String utf8 = new String(eucStr.getBytes(“euc-kr”), “utf-8″);
유치하지만 이런것도…
유치하지만 이런것도 가끔은 써야하는 상황이 있다.
Agreements : 12311
Disagreements : 92
Comment : I am not gonna be here.
Disagreements : 92
Comment : I am not gonna be here.
Use Hibernate and JSF with Less Coding
이 글은 http://blog.exadel.com/?p=8 에서 가져왔습니다.
THIS ARTICLE IS COPIED FROM http://blog.exadel.com/?p=8
The copyright of the article is owned by below person. I swear to delete this when the author request to delete the article from my blog.
Author: Igor Shabalov
As you can see from the heading, I’d like to talk a bit about JSF and Hibernate. Both technologies promise us better results with less code. Perfect, this is exactly what I’m looking for. I strongly believe that less coding is better, even if it comes with a price.
To demonstrate this, I will build a realistic example that interacts with both user and database using JSF and Hibernate. Both technologies promise us a truly declarative way of coding, hiding most of the complexity under the hood. This is good, but there is also a price for this that I’ll talk about later.
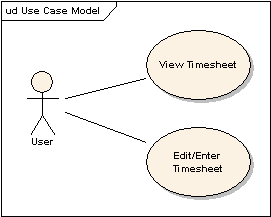
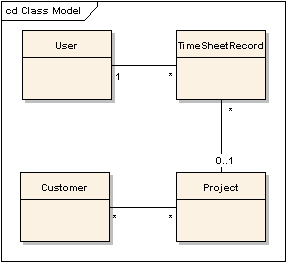
Use Case
I took a simple example from a developer’s everyday life: A user views or edits a timesheet. TimeSheet is a collection of zero or more Records, usually one per day, with information about Task, Project and hours. I’d like to see and edit the entire TimeSheet (all records for the current week) in a single page.
Here are several UML Diagrams to sketch this example out.
In fact, if you get already bored going through all of this, you can download the live example application from here, get it into you favorite IDE (my favorite is Exadel Studio Pro, of course), and see what’s in it. It should work “as is” with no database required, I used HSQL’s in-memory configuration, the perfect solution for such a case. You can download example and use Eclipse menu “Import Existing Project” right from zip file. At least on my computer it works I used JDK 1.5 generics in my example, so, you will need JDK 1.5.

But if you bother to read more, I’ve put a little bit more theory and commentary below.
Visual Components
To implement something like this, you need a good presentation framework that supports a component-based approach. You need a rich set of standard components, but you also need a good way to create and use special components. JSF is perfect for standard components and user interface controls, but it is not set up as well for custom components. Tiles is a better technology for this, but not all JSF implementations are compatible with Tiles. In my example, I use MyFaces, a complete JSF implementation from the Apache Foundation that also works with Tiles.
Hibernate Session and Database Connection
I assume that you already know a little bit about this problem. You need to pay special attention to the moment when you obtain or free a Hibernate Session (and effectively a Database Connection) in your application. There are two major reasons for that:
A Hibernate Session has a one-to-one relation (OK, almost) to a Database Connection. When you get a Session, you effectively get a Connection. And, we are always told that a connection to database is a valuable resource that needs to be used very carefully. For example, it is not good to keep a Database Connection taken between requests.
A Hibernate Session has a special relationship with objects that are loaded by it. The Hibernate Runtime keeps track of all modifications and generates queries to synchronize the object state with the database. If you keep a persistent object somewhere, but forget about the Session, you cannot do anything with this object (ok, almost).
As a result, we were told to use the “One Session per Request” pattern. You cannot keep persistent objects between requests, you need to store primary key and load objects in every request or use the “detach/attach” technique, which is basically same thing. And, you cannot keep queries open.
Session per Session
Instead of this, what I do is use the “One Session per Session” approach. A Hibernate Session gets created when a Web Session is created, and then kept till the Web Session expires. You can either keep Database Connection or use the “disconnect/reconnect” technique. Personally, I believe, that in many cases, you can keep a Database Connection between requests. Most real business applications are intended to be used by a limited number of users.
Personally, I hate the situation where a developer loads an entire database into memory in order to save database connections. Memory is cheap, but still limited! Keep the data in the database and let database vendors worry about efficient memory use. If database vendors try to ration allowable connections, use an open source product, like MySQL.
Or, you can implement a more middle-of-the-road approach. For example, keep the Database Connection opened when you have something like an opened scrollable query on hand, but otherwise use the “disconnect/reconnect” technique.
In the end, the result is clear code, less code overhead, more effective memory use, and fewer database round-trips.
But, everything has a price. In our case, we need to pay special attention to the Hibernate Session Cache. In our case, if somebody loads TimeSheet from user A into memory, then for user B and then repeats that for 10,000 more users, we get into trouble. At any given moment, we will see just one TimeSheet, the current one kept in Web Session, but the Hibernate Session will have all 10,000 of them. This is wrong.
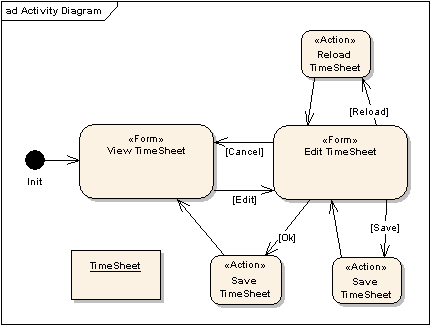
Here is where Business Transaction becomes our good friend! All we need to do is remove TimeSheet from Hibernate Session either on entering or on leaving Business Transaction. In my example, I’m doing this on entrance, using a session.evict() call. This is why we need Business Transaction and why Page Flow is so important, because Page Flow naturally defines transaction boundaries.
Business Transactions
If you take a look to Activity Diagram, you will see Business Transaction. The User can navigate between “View” and “Edit” forms working with the same data, TimeSheet, which is essentially the Business Transaction Context. This Context is properly initialized at the beginning of the transaction; however, we need to pays some special consideration to the end.
Page Flow
Turning to the Page Flow, I have to admit JSF Page Flow is still “under construction”. I have a dream to eventually present you with the completed Page Flow the JSF gurus will deliver. They were talking about integration with Spring Web Flow, so perhaps I will finally be able to see the point of using Spring!
However, JSF Page Flow does exist now. The default implementation is good enough, and I’m using it in my example. Here is a picture of how it looks:
No Transport Beans, Please
In one my previous projects, I suffered through a painful experience with Transport Objects. I will never ever do that again. I recommend using your persistent Model objects anywhere in screens, and let Hibernate unleash its full power. Keep your Presentation Tier close to the Service and Data Tiers. By close, I mean within the same JVM. If you need to expose some of your services (and data) to the outside world, then use the special Services Externalization interface, basically a wrapper around existing services. From this point, you can use Transport Beans, XML, or whatever you want to move data.
Front Controller, Back Controller
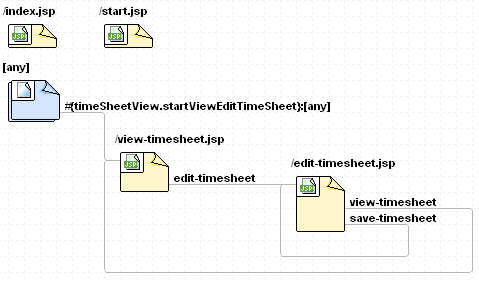
I used Front Controller in my example. It’s very natural for JSF, because it is intended for use with backing beans to implement view-related functions. You can put it anywhere, but I suggest you to keep it separated from “real” controller (Business Service) functions.

Here is a more complicated illustration to show how this works. You can see all this implemented in my example. The Form uses a JSF DataTable component and needs a special DataTableModel. It just display objects from the Model Tier, TimeSheetRecrd. TimeSheetView (it is actually a Front Controller, despite it’s name!) holds all the view-related functions, like saveTimeSheetButton(). TimeSheetService is a typical Business Service implementation, with functions like saveTimeSheet().
Conclusion
I hope you found my example helpful. I didn’t try to make a full blueprint; I just tried to highlight some important issues. And, this isn’t the end at all. I will continue my series of articles about JSF and Hibernate. This time, I didn’t pay too much attention to Database Connection. This is an area that I will revisit soon, when I plan on talking about “scrollable” queries.
Finally, as you can see, my example continues to use the “Injection of Control” pattern that I discussed last time!
Best regards,
Igor Shabalov